

Supplies:
2 - 1x2's (8ft.each)
2 - 1/2" dowels (4ft long)
1 - 3/4" dowel (4ft long)
2 ft 1/2" elastic
1 yd wide ribbon (or 2 - 18" long pieces)
approx. 2 1/2 yd 44-45" wide fabric
1.5 yds of wide rick rack or ribbon (optional)
fabric for pennants - scraps, fat quarters, etc. (optional)
1/2" and 3/4" drill bits
Drill, sandpaper/sander, sewing machine, saw, etc.
Frame:
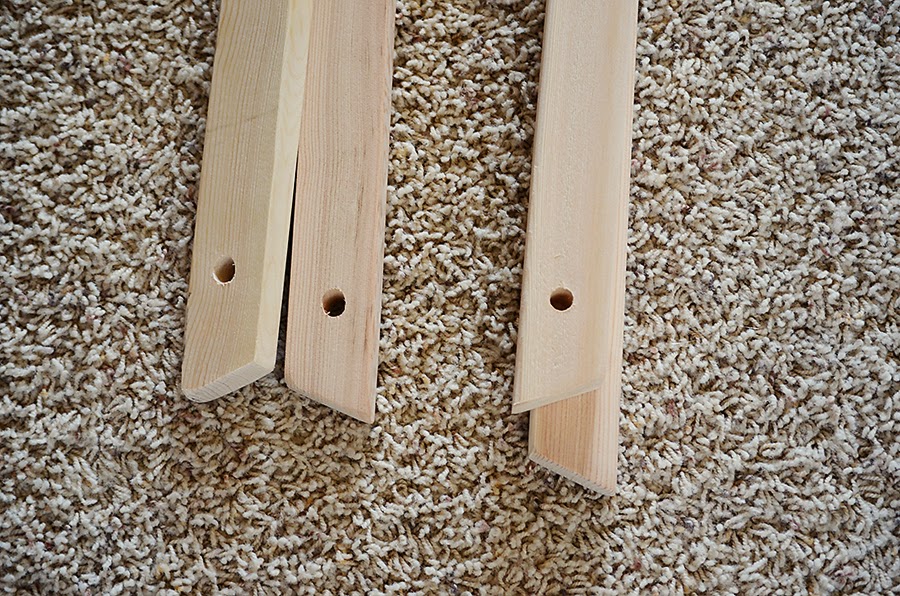
Cut 1x2's in half, then trim one end on each at a 22.5 degree angle (or not. It just looks better, and the legs sit on the floor better). Sand all pieces smooth. Drill a 3/4" hole approximately 5 inches from the non-angled end of each piece. Drill 1/2" holes approximately 1.5-2 inches from the angled ends. These holes are for the dowels, obviously. :) Set all wood pieces aside.
Fold one bottom edge of fabric over 1/2 "; press flat. Fold edge over 1.5" to form a rod pocket; pin and press. Stitch close to edge, about 1/8" or so. Insert the 1/2" dowel into the pocket.
Lay 2 leg pieces down together, angled ends forming an inverted "V". Place one on top of the other and slide the 3/4" dowel through the holes. Repeat with the other 2 pieces on the opposite end of the dowel. Leave about an inch of dowel sticking out of each end. Stand it up and spread the legs to form the tent frame.

Optional pennant decoration:
Cut 6 triangles from your fabric scraps - top edge is 6" long. The points on mine are 8" from the top.
Hem or serge the side edges of each triangle, about 1/4", folded over once.


Finishing the Tent:
Cut your elastic into 4 pieces, about 6" long or so. Assemble the frame and cover. The fabric should be stretched, but not so tight that it bends the rods. Wrap a piece of elastic around the first leg bottom, pinning it to the backside of the fabric just above the rod pocket (so it doesn't show from the front). The loop should be snug enough to help hold the frame together. Repeat on other 3 legs.
If you are adding the pennant, pin the ribbon or rick rack at the peak of the tent on both sides, folding the edges over about 1/2" to hide raw edges. Pin each pennant under the ribbon, spaced evenly. You will want LOTS of pins so nothing moves around while you're sewing it on. Pin one of the 18" ribbons to the peak at both ends, as well. Remove the cover from the frame carefully. Stitch down the middle of the pennant ribbon, then sew on the ribbons and elastic loops.

Insert 1/2" dowels into rod pockets (leave these in when taking it down). Insert 3/4" dowel into holes at tops of legs, and spread them out. Lay cover over the top, pulling sides down. Wrap elastic loops around leg bottoms, then insert smaller dowels into holes at bottoms of legs. Tie ribbons at peak ends around the tops of the legs and beneath the inch or so of dowel sticking through the holes. This should provide the tent with more stability. The legs will collapse outward if pushed or slid along the floor (tents work best on carpet or grass).
To take it down, untie the ribbons, slide elastic loops off, and take small dowels out of the legs - DON'T take them out of the rod pockets, though. Remove the cover, fold it in half with the dowels together, and lay it on the floor. Take the legs off the top dowel and lay all 5 pieces on the cover at the end wit the small dowels. Roll everything up, and then use the ribbons to tie around the bundle for easy storage. (THAT part was unintended brilliance on my part!!)


Are you kidding? That is what you make other moms compete with for parties?! Seriously, that is incredible, and so you. My girls would have loved that when they were little. Actually, they would probably like it now.
ReplyDeleteThanks, Kirsten!
ReplyDeleteI want to do this any pictures yet. I need to make 10
ReplyDeleteOh my gosh! I get sooo busy that I forget to come back to this sometimes! I added some pictures of the construction - hope it helps!
ReplyDeleteCool I may do this for a sleepover im throwing
ReplyDeleteSuch a wonderful idea. I've been looking to create some portable tents for classrooms; especially our infant classroom. So colorful and soothing. Perfect for naps. Thank you for sharing. When we redesign our classroom, I will send you pictures. Thank you, again.
ReplyDeleteThanks, Patricia! I would love to see pictures!
DeleteThanks, Patricia! I would love to see pictures!
DeleteHow much fabric did you use?
ReplyDeleteAbout 2.5 yards, give or take an inch. :) The exact measurement depends on where you drill the holes, but 2.5 should be enough.
DeleteAbout 2.5 yards, give or take an inch. :) The exact measurement depends on where you drill the holes, but 2.5 should be enough.
DeleteGreat ideas! really impressed with your original and genuine way you have put your story across - you're an inspiration and I am following your journey - awesome work!
ReplyDeletehi.. great idea. I'm not quite sure how the elastic loops at the bottom corners, and the ribbon at the tops, improve the stability?
ReplyDeleteIt seems like the side walls can still slide outward and flatten the whole tent? Unless, you use a string to connect the 1/2" dowels,
or the angled bottoms of the 1x2 frame legs? This would limit the width of the tent and at least prevent it from spreading out flat?
Unless I'm misunderstanding, or missing something obvious. Thanks again for this write-up. I think I'll be building a bunch of these for my daughter's slumber birthday party coming up soon! Thanks.
I think I am going to do this at the sleepover party me and my BFF are hosting at her house. This is a great idea and I love how they fold. I can now make this at my house and bring it over and put it together at her house.
ReplyDeleteHow expensive would this be?
ReplyDeleteIt's been awhile, but I believe they cost around $7-10 each. It really depends on the fabric used. That's the biggest expense, so I used $4 twin sheets for most of them.
DeleteIt's been awhile, but I believe they cost around $7-10 each. It really depends on the fabric used. That's the biggest expense, so I used $4 twin sheets for most of them.
Delete10$ a set including fabric and wood?
Deletereally amazing tips for making the play tents. this will be really helpful to make one for my small baby. he will really like it, thanks for such beautiful blog.
ReplyDeleteI think this is an amazing idea I did this with my friends but made it a little bigger and it great idea
ReplyDeleteHow much did you spend for just one, because I am considering making 5??
ReplyDeleteHi. The 3/4 in dowel seems to big. Do you think I could go smaller on all dowels - use 1/2 inch for top and something smaller for bottom? ALso, what is the purpose of the elastic?
ReplyDeleteHi. Such a great idea!! Do you think you could do smaller dowels. Maybe 1/2 in at top and smaller for bottom? Also, what is the purpose of the elastic?
ReplyDeleteHi, all! The larger dowels help provide stability. Smaller ones flex too much. The elastic loops wrap around the legs and dowels to help keep them from sliding apart. :)
ReplyDeleteHow long does it take to make??
ReplyDeleteMaybe an hour or 2, depending on your skill level.
DeleteWhere do you get the sticks
ReplyDeleteHome Depot. :)
DeleteFun idea! Where did you find $4 twin sheets? Thanks!!
ReplyDeleteSmith's Marketplace and WalMart. :)
DeleteSmith's Marketplace and WalMart. :)
DeleteWhat is the average cost to make one of these? I'm going to have 10 kids.
ReplyDeleteWhat was the cost to make one? This looks like an easy project and would honestly make cute gifts if it wasn't too expensive. Great idea!
ReplyDeleteThanks! They cost about $7-10 each, depending on the fabric used.
DeleteHave read many blogs in the net but have never come across such a well written blog. Good work keep it up.
ReplyDeletePlay Tent
Such a wonderful tent it is, I have seen many types of tents but you gave me the information of a wonderful Luxury Tents which I can use in my night party and I can also make it at my house with the help of your great information.
ReplyDeleteHow cute.
ReplyDeleteThis comment has been removed by a blog administrator.
ReplyDeleteSuperb its really amazing tips for making the Glamping tents. It will be helpful to make Glamping . I like your post thanks for sharing this blog .
ReplyDeleteThanks for sharing the step b y step guidance. Couldnt have done it without.
ReplyDeletemilwaukee bucks tickets
milwaukee bucks event tickets
I am really grateful for the DIY tips. Thanks for helping.
ReplyDeletecheap airport parking
airport parking deals
This comment has been removed by a blog administrator.
ReplyDeleteOof
ReplyDeleteBell tent Village Company is wholesale bell tent suppliers in United Kingdom,Europe.
ReplyDeletehttps://belltentvillage.co.uk/
I am unable to read articles online very often, but I’m glad I did today. This is very well written and your points are well-expressed. Please, don’t ever stop writing. Best Pop Up Canopy Tents
ReplyDeleteExcellent Service for your Business Must Rank #1 on Google
ReplyDeleteYou can get Best SEO Solutions by Assistance Experts provide digital marketing, website development, seo expert services and social media internet
SEO Expert Services Your branding Solutions. SEO Expert Services
,best seo expert services,online seo expert services,
Nice post.Really amazing.With Monu Enterprises you will find wide range of Wedding Sofa And Chair, Tent Decorative Items, Decorative Lantern And Lamp.
ReplyDeleteCeiling Tent manufacturer
Thank you so much for this post, it is so helpful for making homemade Canopy Tent, keep sharing this type of posts.
ReplyDeleteyou should also consider your camping style. This will help you further to buy a tent to make your whole camping experience memorable. Indeed price is one of the most important factors to consider
ReplyDeletebest 4 person tent under 200
Best Family Tents For Bad Weather
You can choose the right outdoor adventure accessories for your tours. Find everything you need for your next adventure at Exploreoutdoorsco.
ReplyDeleteNice article. Really you write wonderful stuff.
ReplyDeleteWe offer a Party Tent Rental Minneapolis to ensure your event successfully. Hire us for your next event and get unforgettable and in-order management!
Invest with 200$ and get a returns of 5,000$ within seven business working days.
ReplyDeleteWhy wasting your precious time online looking for a loan? When there is an opportunity for you to invest with 200$ and get a returns of 5,000$ within seven business working days. Contact us now for more information if interested on how you can earn big with just little amount. This is all about investing into Crude Oil and Gas Business.
Email: HappyInvestment-world_inc@protmail.com
love the site
ReplyDeletehttps://www.tentpitched.com/best-tent-for-dog-owners/
Your individual accelerate inside of extremely academic. After i attain regarded the specific exegesis software package safety an individual assent brought up in addition I truly do withstand oahu is the satiate After i take witnessed as a result withstand. My partner and i implore you to definitely multiply how the unique admittance treatments are typically on account of. glamping yorkshire
ReplyDeleteKid Tents
ReplyDeleteHi would you mind stating which blog platform you're using? I'm planning to start my own blog in the near future but I'm having a hard time making a decision between BlogEngine/Wordpress/B2evolution and Drupal. The reason I ask is because your layout seems different then most blogs and I'm looking for something completely unique. P.S My apologies for being off-topic but I had to ask!
ReplyDeleteFeatures of your Glamping Pods
amazing article http://topofoutdoors.com
ReplyDeletehttps://barbietrip.tumblr.com/post/615389536646823936/type-of-camping-tents
ReplyDeletehttps://cuddlycasdean.tumblr.com/post/615390219126128640/types-of-camping-tents-2020
ReplyDeletehttps://dakigalaxy.tumblr.com/post/615391747315564544/how-to-choose-tents-for-camping
https://forsw0rn.tumblr.com/post/615395098046447616/camping-for-beginners
https://keattg.tumblr.com/post/615396757695758336/best-tents-for-your-next-family-camping-trip-2020
https://mobile-tricks-tips.tumblr.com/post/615397224748302336/camping-apps-for-next-outdoor-adventure
https://travel-to-uk.tumblr.com/post/615398247167590400/features-in-a-camping-tent
Really this is a nice stuff. It will help us for next camping., Hopefully people will get a lot of help from this checklist.Thank you..
ReplyDeletebest family tent for bad weather
best sleeping pad for hammock
best tent for camping with dog
best camping chair for bad back
Nobody can beat the tent rentals services of Valley Luxury Events.
ReplyDeletecamping tents factory
ReplyDeletecastle princess tent
ReplyDeleteI never thought that I will be qualify for a loan that Officer Pedro and his loan company granted me which was very smooth and transparent in every conversation that we make through the loan process, I will once again thank him and his loan organization for a job well done by offering me a loan of 22 million Euro with the low rate of 2% annual return they are genuine and loan register company with simple terms and conditions.
ReplyDeleteContact the loan company through pedroloanss@gmail.com whatsapp: + 1-8632310632.
Thanks for your interesting ideas. the information's in this blog is very much useful for me to improve my knowledge.
ReplyDeletebest offset smoker grill combo
It's also remarkably compact, weighing only three pounds, making it easy to transport. Discover here for more details regarding tent camping.
ReplyDeletethis tent worked out very well for my granddaughter's slumber party (made 8). I found twin sheets at the christmas tree store for 5.00 each. the flat sheet worked perfectly and the fitted sheet fit great on a blowup mattress. I added each girls name on the pillow case. Thank you for sharing the directions.
ReplyDeleteThis blog is nice an provide me good information. Thanks for sharing it Party Bus Rental Long Island
ReplyDeleteThese adorable glamping play tents are just too cute! 😍 I can imagine setting up a little glamping site for the kids in my backyard and using these tents for a fun adventure. And when it comes to convenience, I'd definitely opt for Express Parking to save time and make the whole experience even smoother. Thanks for the inspiration! 🏕️✨
ReplyDeleteThese glamping play tents are absolutely adorable! 😍 I envision creating a mini glamping setup in my backyard for the kids, complete with these charming tents for an exciting adventure. And for added convenience, opting for long stay parking Gatwicksounds like a smart choice to save time and ensure a seamless experience. Thanks for the inspiration! 🏕️✨
ReplyDelete