Supplies:
2 - 1x2's (8ft.each)
2 - 1/2" dowels (4ft long)
1 - 3/4" dowel (4ft long)
2 ft 1/2" elastic
1 yd wide ribbon (or 2 - 18" long pieces)
approx. 2 1/2 yd 44-45" wide fabric
1.5 yds of wide rick rack or ribbon (optional)
fabric for pennants - scraps, fat quarters, etc. (optional)
1/2" and 3/4" drill bits
Drill, sandpaper/sander, sewing machine, saw, etc.
Frame:
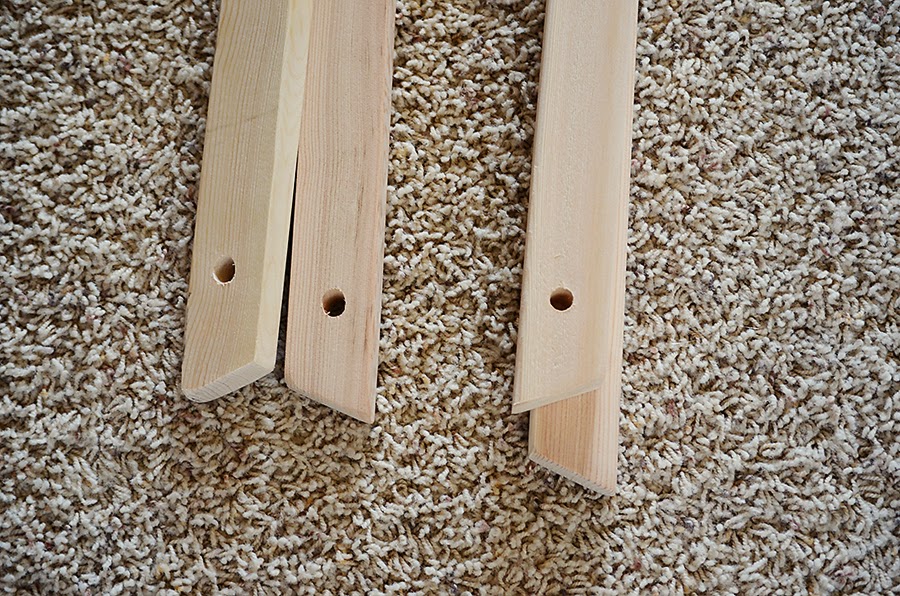
Cut 1x2's in half, then trim one end on each at a 22.5 degree angle (or not. It just looks better, and the legs sit on the floor better). Sand all pieces smooth. Drill a 3/4" hole approximately 5 inches from the non-angled end of each piece. Drill 1/2" holes approximately 1.5-2 inches from the angled ends. These holes are for the dowels, obviously. :) Set all wood pieces aside.
Cover:
Fold one bottom edge of fabric over 1/2 "; press flat. Fold edge over 1.5" to form a rod pocket; pin and press. Stitch close to edge, about 1/8" or so. Insert the 1/2" dowel into the pocket.
Lay 2 leg pieces down together, angled ends forming an inverted "V". Place one on top of the other and slide the 3/4" dowel through the holes. Repeat with the other 2 pieces on the opposite end of the dowel. Leave about an inch of dowel sticking out of each end. Stand it up and spread the legs to form the tent frame.
It will NOT be very stable at this point, but everything works out when it's fully assembled. Drape the cover over the top, and insert the 1/2" dowel into the holes at the bottom of the legs on one side of the tent. Insert the other dowel into the other side's holes. Gently pull the fabric down to stretch it tight over the frame. Now, measure where the second rod pocket should go. Leave a 1/2" to fold over so the seam is sealed. :) This part can vary, which is why I didn't give you exact measurements. It all depends on where you drilled your holes. :) Once you have this figured out, remove the cover, trim the fabric, and repeat the steps to create the second rod pocket.
Optional pennant decoration:
Cut 6 triangles from your fabric scraps - top edge is 6" long. The points on mine are 8" from the top.
Hem or serge the side edges of each triangle, about 1/4", folded over once.

Finishing the Tent:
Cut your elastic into 4 pieces, about 6" long or so. Assemble the frame and cover. The fabric should be stretched, but not so tight that it bends the rods. Wrap a piece of elastic around the first leg bottom, pinning it to the backside of the fabric just above the rod pocket (so it doesn't show from the front). The loop should be snug enough to help hold the frame together. Repeat on other 3 legs.
If you are adding the pennant, pin the ribbon or rick rack at the peak of the tent on both sides, folding the edges over about 1/2" to hide raw edges. Pin each pennant under the ribbon, spaced evenly. You will want LOTS of pins so nothing moves around while you're sewing it on. Pin one of the 18" ribbons to the peak at both ends, as well. Remove the cover from the frame carefully. Stitch down the middle of the pennant ribbon, then sew on the ribbons and elastic loops.
To Assemble/Take Down:
Insert 1/2" dowels into rod pockets (leave these in when taking it down). Insert 3/4" dowel into holes at tops of legs, and spread them out. Lay cover over the top, pulling sides down. Wrap elastic loops around leg bottoms, then insert smaller dowels into holes at bottoms of legs. Tie ribbons at peak ends around the tops of the legs and beneath the inch or so of dowel sticking through the holes. This should provide the tent with more stability. The legs will collapse outward if pushed or slid along the floor (tents work best on carpet or grass).
To take it down, untie the ribbons, slide elastic loops off, and take small dowels out of the legs - DON'T take them out of the rod pockets, though. Remove the cover, fold it in half with the dowels together, and lay it on the floor. Take the legs off the top dowel and lay all 5 pieces on the cover at the end wit the small dowels. Roll everything up, and then use the ribbons to tie around the bundle for easy storage. (THAT part was unintended brilliance on my part!!)


